The above vid-clip shows how to use an oscilloscope in detail
(but remember - he is American and America has a 60Hz mains AC supply - whereas we have a 50Hz one in the UK!)
An oscilloscope is basically a voltmeter that shows you how voltage varies with time... it plots a voltage against time graph on the screen.
It is connected in parallel to the component you are looking at (like a voltmeter).
Instead of getting a digital readout (as on a multimeter) it gives you a graph.
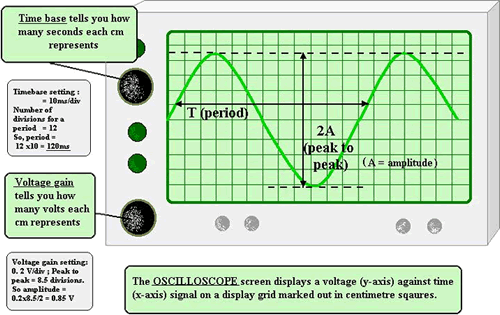
The y-axis is voltage (so you can see how many volts are across the component).
The x-axis is time (so you can see whether the voltage is steady (D.C.) or varying (A.C.))
This is most useful when you look at AC voltages.
You can switch the x-axis on or off using the timebase control dial – and change the scale of the ‘graph’ too using this dial.
You can change the y-axis scale using the voltage gain dial.
When you change the settings the graph looks different but you haven’t changed the supply voltage – just what the graph of it looks like.
You should be
able to work out the frequency from the period by using
f
= 1/T
You should
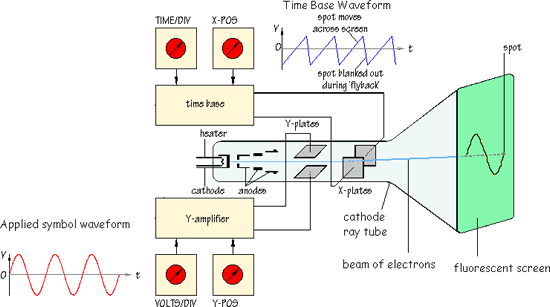
know the basics of how one works:
The above graphic is adapted from doctronics.co.uk
(see above link)
A heated electrode
gives off electrons (thermionic emission).
If these are accelerated
across a vacuum (must be a vacuum otherwise they would just
ionize the air!) by a potential
difference (they would be pulled towards a positive plate).
They can be directed
at a fluorescent screen and where they hit it will light up
- photons of visible light emitted
If the electron
beam has the voltage you are investigating put across it (on the Y
plates) it will be pulled towards the +ve one (bigger the voltage
the bigger the pull!... so the further up the screen the beam will
move)
Across the screen
a sawtooth wave pulls the spot from left to right steadily
(at a speed shown on the timebase dial) and then flips it back to
the left again to start again.
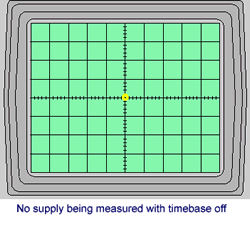
If the timebase is off you just get a spot - you can vary its size using the focus and intensity controls - you shouldn't leav it on like this for a long time as it will 'burn out the screen' - affect the zinc suphide coating
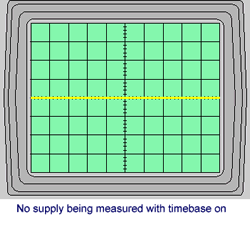
If the timebase is on at a good speed you get a line because the fluorescence doesn't have time to die away before the screen is hit again!
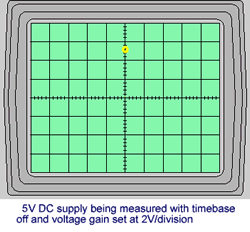
If a DC voltage is applied across the Y-plates when the timebase is off then the steady voltage makes the spot be a fixed distance higher than its rest position and you get a spot (above or below) the no signal spot.
You can measure the voltage by working out how much it has 'jumped up' and converting the divisions on the screen to volts.
It is good practice to make it jump up - measure the voltage and then switch the contacts round - making it jump down - and measure the voltage again - you should get the same result!
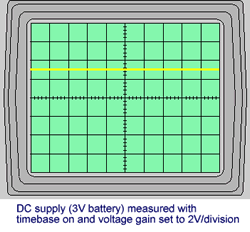
If a DC voltage is applied across the Y-plates when the timebase is on then the steady voltage makes the line be a fixed distance higher than its rest position and you get a horizontal line (above or below) the no signal line.
You measure the voltage in the same way as you would using the 'spot'
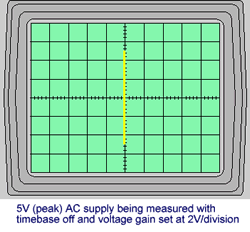
If an AC voltage is applied across the Y-plates when the timebase is off then the sinusoidally varying voltage makes the spot move up and down around its rest position and you get a vertical line through and centring on the no signal spot. (From this you can work out the peak to peak voltage).
Remember that the peak to peak voltage has to be halved to give you the peak voltage - and that has to be divided by root 2 to give you the RMS voltage!
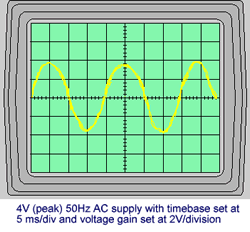
If an AC voltage is applied across the Y-plates when the timebase is on then the sinusoidally varying voltage makes the spot move up and down around its rest position as it moves across the screen and you see a sine wave graph. (From this you can work out the period and hence the frequency of the signal - do it across several periods on different timebase settings to double check your readings).
Click here to go to a page that explains how to set up and use an oscilloscope in a practical experiment.
Click here for a page of exam-type questions to try
Click here for another page of questions - suited for group work and discussion - to try
Here is a link to an external site that will tell you how to set an oscilloscope up, use it and explain how it works


 Here
Here